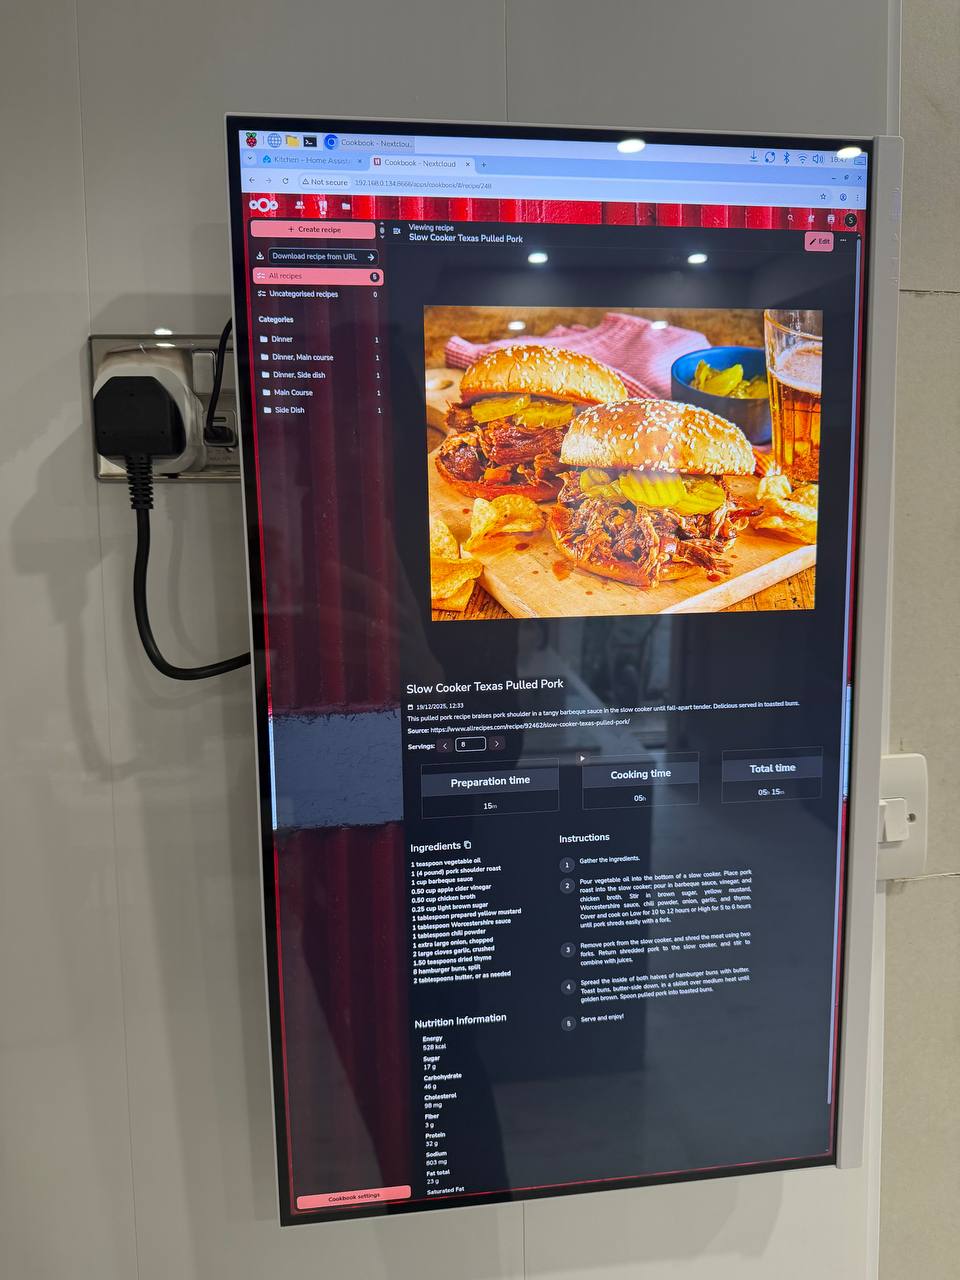
DIY Smart Kitchen Display: Raspberry Pi 5, Touchscreen Monitor & Home Assistant
This is a living build post — the core setup is done and working, but I'm still adding features. I'll update this as the build evolves.
The Idea
I wanted a proper kitchen display. Not just a tablet propped against the splashback — something permanent, clean, and actually useful every day. The brief:
- Recipes accessible without getting my phone out
- Home Assistant dashboard visible in the kitchen
- Calendar and reminders at a glance
- Smart enough to turn itself off at night and when we're not home
- Something Penny would actually want on the wall
The result is a wall-mounted 27-inch touchscreen running a Raspberry Pi 5, pulling recipes from Nextcloud Cookbook, showing our Home Assistant dashboard, and powered by a Zigbee smart plug that keeps it automated.
The Parts
| Part | What I used | Link |
|---|---|---|
| Single-board computer | Raspberry Pi 5 (4GB) | Amazon UK |
| Touchscreen monitor | ZFTVNIE 27" 2K IPS Touchscreen | Amazon UK |
| Wall mount | ONKRON 360° Rotating TV Bracket | Amazon UK |
| Smart power | Zigbee Smart Plug 4-Pack | Amazon UK |
Total build cost: approximately £350–£380
Why This Monitor
The ZFTVNIE 27" was the key find. Most 27-inch touchscreen monitors at this size are aimed at commercial use — point-of-sale terminals, kiosks — and priced accordingly (£600–£1,000+). This one is 2K (2560×1440), IPS panel, 100Hz, 10-point touch, and has USB-C, HDMI, and VGA inputs.
For a kitchen display it's perfect. The IPS panel looks good from an angle (important when you're moving around the kitchen), the touch response is accurate, and the resolution is sharp enough that recipes are genuinely readable from the other side of the room.
If this monitor was made by a big brand it would be twice the price. Worth checking out if you're looking for a large touchscreen without the commercial price tag.
Why Raspberry Pi 5
The Pi 5 is a significant step up from the Pi 4 — noticeably faster browser performance, which matters when you're running a kiosk-mode Chromium with multiple tabs. Boot time is quicker, and it handles our Home Assistant dashboard without any lag.
Setup is Pi OS (Bookworm, 64-bit). I configured Chromium to launch in kiosk mode at startup, opening the tabs we use most: Nextcloud Cookbook, Home Assistant, and our shared Google Calendar.
The Mount
The ONKRON R1-B is a 360° rotating wall mount for screens up to 35 inches. We mounted it portrait (vertical) as our default — it fits the wall space better and works perfectly for recipe browsing. The rotation means we can swing it landscape if we want to watch something while cooking.
Installation was straightforward. The bracket attaches to the wall with four screws, the VESA plate mounts to the back of the monitor (75×75 or 100×100 — ours is 100×100), and it clicks in. The Pi is USB powered — one cable runs from the Pi to the monitor (USB-C for power + display) and a USB-A for touch, then power to the smart plug. The Pi connects to our home WiFi; no Ethernet or PoE needed for this setup.
The Smart Plug Setup
The Zigbee smart plug does three things:
- Turns the display on when we arrive home — Home Assistant presence detection triggers it
- Turns it off at night — automation set for 11pm
- Turns it off when both of us are away — no point running a screen to an empty house
The plugs are the ZigBee Smart Plug 13A UK from Amazon — four-pack, energy monitoring included, work natively in Home Assistant via Zigbee2MQTT with no cloud dependency. Compact design that doesn't block adjacent sockets.
Software Stack
- OS: Raspberry Pi OS Bookworm (64-bit)
- Connectivity: WiFi, USB-powered (no Ethernet required)
- Display manager: Chromium in kiosk mode, auto-launch on boot
- Recipes: Nextcloud Cookbook — self-hosted on our Unraid homelab, recipes imported from URLs or added manually
- Dashboard: Home Assistant (running on the homelab, accessed via local IP)
- Calendar: Google Calendar in a browser tab
- Remote management: SSH from my main machine — no keyboard or mouse needed once it's running
The Nextcloud Cookbook app is the hidden gem here. It scrapes recipes from any URL, stores them locally on your Nextcloud instance, and presents them cleanly. No ads, no pop-ups, no "scroll past my life story" — just the recipe. On a 27-inch touchscreen it's genuinely a joy to use while cooking.
What's Still in Progress
This build is working well day-to-day, but I'm still adding to it:
- More cameras on the dashboard — I'm adding our Reolink camera feeds directly to the HA dashboard view on this screen
- Seasonal themes — we change the Home Assistant dashboard theme to match Penny's kitchen decor. We just swapped from Easter to a summer theme — it's a small thing but it makes the display feel like part of the home rather than a piece of tech stuck on the wall
- Voice control — considering adding a mic so we can interact with HA without touching the screen when hands are messy
I'll update this post as those features come together.
Is It Worth Building?
Yes, if you're already running Home Assistant and Nextcloud. The incremental cost to add this display is low — the Pi 5 and touchscreen together are under £300 — and the day-to-day usefulness is high.
The recipe display alone has changed how we cook. Having a large, readable screen at counter height that doesn't require unlocking a phone, dealing with the screen dimming, or scrolling past ads is genuinely better than anything else we've tried.
If you're not already on the self-hosted stack, the setup overhead is higher, but still very achievable — my Getting Started with Home Assistant guide covers the basics.
Parts List (Quick Reference)
- 🖥️ ZFTVNIE 27" 2K Touchscreen Monitor
- 🟥 Raspberry Pi 5 (4GB)
- 🔄 ONKRON 360° Rotating Wall Mount
- 🔌 Zigbee Smart Plug 4-Pack (with energy monitoring)
As an Amazon Associate I earn from qualifying purchases. All products were bought with my own money.